

I announced in a previous post that AppSecInc. has open-sourced its Wix extensions. We’ve continued developing the project for our own needs and have seen some adoption, especially for installing databases. This was expected, since what distinguishes these extensions from stock Wix ones is a programming model that is not narrowly focused on MSSQL, effectively supporting any ODBC database today and creating the opportunity to support other database targets, such as Oracle.
In this post I’ll show you how to get started with installing an MSSQL database in just a few lines of code.
Adding References
First, you must add a reference to the WixDataSource extension to your Wix project and include the DataSource extension’s namespace into the Wix XML declaration.
<Wix xmlns="https://schemas.microsoft.com/wix/2006/wi"
 xmlns:DataSource="https://schemas.appsecinc.com/wix/DataSourceExtension">
ODBC Connection
To connect to a database you need an ODBC connection. For now, we don’t have ODBC_CONNECTION_STRING defined, so each implementation that uses this connection will need (and does) supply its own default. For example, SQL server extensions assume that the default connection string refers to a local database with Windows authentication.
<DataSource:ODBCConnection Id="DemoSQLServerConnection" ConnectionString="[ODBC_CONNECTION_STRING]" />
MSSQL Database
We can now define an MSSQL database.
<Component Id="MSSQLDatabaseMsiComponent" Guid="0FEAF4B6-7065-47e2-A403-E94A4B176772">
  <CreateFolder/>
  <DataSource:MSSQLDatabase Id="MSSQLDemoDatabase" Name="DemoDatabase" ConnectionId="DemoSQLServerConnection"
   CreateOnInstall="yes" DropOnUnInstall="no" CheckIfExists="yes" />
</Component>
What’s happening here?
We tell the extension to create a database called DemoDatabase using the DemoSQLServerConnection. We tell it to create the database on install and not to drop it on uninstall. We also tell it to check whether the database exists and not to fail if that’s the case. This is a typical scenario where a DBA will pre-create the database and the installer will need to create tables and upload initial data into it.
We’ve nested the database under a component, so component rules apply. You can include the component into a feature and the user can, for example, choose to install or not install the feature. You can add other conditions at many levels here, etc.
Database Schema
A database without a schema is not very useful. We author a .sql file that creates the schema and execute it on FirstInstall.
<DataSource:MSSQLDatabase Id="MSSQLDemoDatabase" Name="DemoDatabase" ConnectionId="DemoSQLServerConnection"
  CreateOnInstall="yes" DropOnUnInstall="no" CheckIfExists="yes">
  <DataSource:ODBCExecute Id="MSSQLDemoDatabase_CreateSchema" ExecuteOnInstall="yes"
   BasePath="[INSTALLLOCATION]" Type="SqlServer" File="Schema.sql">FirstInstall OR Upgrading</DataSource:ODBCExecute>
</DataSource:MSSQLDatabase>
To simplify things for the purposes of this post, the Schema.sql file knows how to handle its own upgrade.
There are some more interesting things here. Notice that we use a generic ODBCExecute extension that works for this specific MSSQL database. The declaration has a Type=”SqlServer”. This is a new feature in MSI Extensions 1.2 – the file will be parsed with an actual SQL parser, split by GO statements (configurable) and execute the statements one-by-one. The idea is that the parsers can one day become converters and adjust syntax from, for example, HQL to SQL of a specific database target. For now, this makes SQL execution identical to one in MSSQL Query Analyzer.
Secondly, with MSI Extensions 1.2, Schema.sql may be an ANSI or a UTF-8 file. This is detected automatically. You can finally deploy your databases with Russian table names or content.
User Experience
We now want to give users an opportunity to choose where to install this database and which credentials to use. For this purpose we add the WixCommonUiExtension.dll to the project and redefine the UI sequence to reference some stock dialogs.
<?xml version="1.0" encoding="utf-8"?>
<Include>
  <Property Id="CREATE_DATABASE_LOGON_TYPE" Value="WinAuthCurrentUser" />
  <Property Id="CHECK_CREATE_DATABASE_PERMS" Value="yes" />
  <Property Id="RUNTIME_DATABASE_LOGON_TYPE" Value="WinAuth" />
  <Property Id="CHECK_RUNTIME_DATABASE_PERMS" Value="yes" />
  <Property Id="RUNTIME_DATABASE_NAME" Value="Northwind" />
  <Property Id="RUNTIME_DATABASE_PERMS_TABLE" Value="Authors" />
  <UI>
    <DialogRef Id="SelectDbDlg" />
    <DialogRef Id="DbCreateCredDlg" />
    <DialogRef Id="GenericErrorDlg" />
    <DialogRef Id="WelcomeDlg" />
    <DialogRef Id="VerifyReadyDlg" />
    <DialogRef Id="ErrorDlg" />
    <DialogRef Id="FatalError" />
    <DialogRef Id="FilesInUse" />
    <DialogRef Id="UserExit" />
    <Publish Dialog="WelcomeDlg" Control="Next" Event="NewDialog" Value="SelectDbDlg">NOT Installed</Publish>
    <Publish Dialog="SelectDbDlg" Control="Next" Event="NewDialog" Value="DbCreateCredDlg">NOT Installed</Publish>
    <Publish Dialog="SelectDbDlg" Control="Back" Event="NewDialog" Value="WelcomeDlg">NOT Installed</Publish>
    <Publish Dialog="DbCreateCredDlg" Control="Next" Event="NewDialog" Value="VerifyReadyDlg">NOT Installed</Publish>
    <Publish Dialog="DbCreateCredDlg" Control="Back" Event="NewDialog" Value="SelectDbDlg">NOT Installed</Publish>
    <Publish Dialog="VerifyReadyDlg" Control="Back" Event="NewDialog" Value="DbCreateCredDlg">NOT Installed</Publish>
    <Publish Dialog="ExitDialog" Control="Back" Event="EndDialog" Value="VerifyReadyDlg">1</Publish>
    <Publish Dialog="ExitDialog" Control="Finish" Event="EndDialog" Value="Return" Order="999">1</Publish>
  </UI>
</Include>
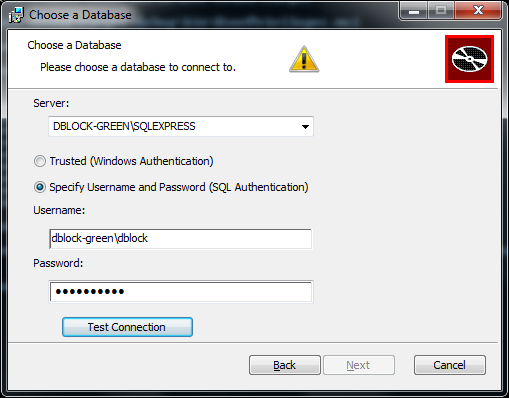
Notice the DbCreateCredDlg that was inserted and a few defaults for various options that drive this dialog. The latter supports testing credentials, choosing whether to use SQL Server or Windows authentication, etc.
The DbCreateCredDlg looks like this and publishes the ODBC_CONNECTION_STRING property, connecting the dots between the UI and the ODBC connection used to create the database.
Conclusion
That’s it. You now have a working database installer with virtually zero lines of code.