

Someone recently asked how to support uninstall in dotNetInstaller, specifically with MSI components. It’s a question that comes up frequently, and it’s a powerful feature of dotNetInstaller. We use it for a very large bootstrapper (1.2GB) across a dozen installers, including some big ones that we didn’t write (IBM Cognos).
While the documentation explains the basics, it’s a bit thick. This is a step-by-step tutorial.
The Basics
Create an Installer
Create a basic WIX MSI, MySetup. I’ve added a dummy component and feature to it.
<?xml version="1.0" encoding="UTF-8"?>
<Wix xmlns="https://schemas.microsoft.com/wix/2006/wi">
  <Product Id="*" Name="MySetup" Language="1033" Version="1.0.0.0" Manufacturer="MySetup"
           UpgradeCode="1c5ecb1a-22af-47c1-a6d8-be39d61142db">
    <Package InstallerVersion="200" Compressed="yes" />
    <Media Id="1" Cabinet="media1.cab" EmbedCab="yes" />
    <Directory Id="TARGETDIR" Name="SourceDir">
      <Directory Id="ProgramFilesFolder">
        <Directory Id="INSTALLLOCATION" Name="MySetup">
          <Component Id="MyComponent" Guid="{FFE299B7-6FFF-4461-A7A2-AD9F1C8569EA}">
            <File Id="Product.wxs" Source="Product.wxs" />
          </Component>
        </Directory>
      </Directory>
    </Directory>
    <Feature Id="ProductFeature" Title="MySetup" Level="1">
      <ComponentRef Id="MyComponent" />
    </Feature>
  </Product>
</Wix>
Create a Bootstrapper
Create a simple bootstrapper that installs MySetup.msi. Add an Installed Check and package the MSI in the bootstrapper.
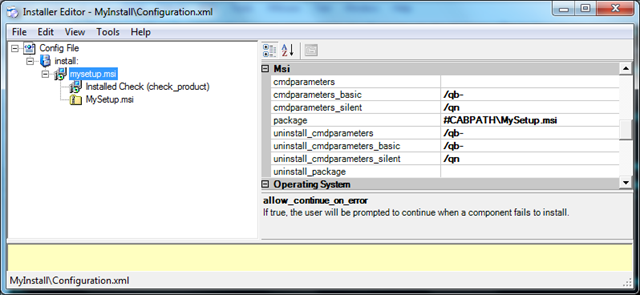
Note that the GUID matches the UpgradeCode in the WIX MSI we have created above.

Link the Bootstrapper
You can now link the bootstrapper with InstallerLinker. We’ll use MSBuild to automate our build.
<Target Name="build-bootsrapper">
  <Message Importance="high" Text="Building bootstrapper, $(Configuration) ..." />
  <Exec Command="dotNetInstaller\bin\InstallerLinker.exe /Embed+ /Template:dotNetInstaller\bin\dotNetInstaller.exe /Output:$(ReleaseDir)\MyInstaller.exe /Configuration:MyInstall\Configuration.xml /AppPath:MySetup\bin\$(Configuration)" />
</Target>
Run the Bootstrapper
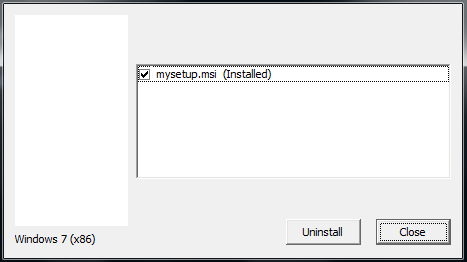
You can run the bootstrapper and MySetup.msi will be installed. Run the bootstrapper again, and it will offer you to uninstall MySetup.msi. It has detected that it’s already installed and will automatically switch to uninstall mode. This will uninstall the application and it works.
Great! I have an uninstaller, right?
Not really. The problem with what we have created is that the bootstrapper needs to be left on the machine after installation. With my 1.2GB bootstrapper that’s really not an option. That’s also a chicken-and-egg problem, because the bootstrapper needs to contain itself to be included in an installer to be used for uninstall if we wanted to create, for example a shortcut.
What we need is a bootstrapper that can do uninstall, and that can be included in MySetup.msi, installed and used post-installation.
Generate an Uninstaller
Save the Product Code
An MSI can be installed with msiexec /i MySetup.msi and can be uninstalled with msiexec /x {product id}. Let’s augment the MSI and write the product code for the MSI into registry. The bootstrapper will be able to look for that value to execute the msiexec /x command.
<RegistryKey Root="HKLM" Key="SOFTWARE\MySetup">
  <RegistryValue Name="ProductCode" Value="[ProductCode]" Type="string" KeyPath="yes" />
</RegistryKey>
Use the Product Code
It is now possible to use this product code from registry for the uninstall package, a nice feature of DNI.

Including the Bootstrapper in the MSI
First, let’s build this bootstrapper without embedded files. It’s the same command line with /Embed-. We’ll place the output to Uninstall.exe.
<Target Name="build-uninstall">
  <Message Importance="high" Text="Building bootstrapper, $(Configuration) ..." />
  <Exec Command="dotNetInstaller\bin\InstallerLinker.exe /Embed- /Template:dotNetInstaller\bin\dotNetInstaller.exe /Output:MySetup\bin\$(Configuration)\Uninstall.exe /Configuration:MyInstall\Configuration.xml" />
</Target>
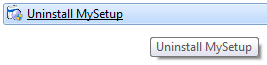
Include Uninstall.exe in the MSI and create an uninstall shortcut to the MSI. The shortcut runs Uninstall.exe /x, forcing uninstall.
<Component Id="MyUninstall" Guid="{FDF5D5EB-35B8-429b-9E39-8C4CEFE46F99}">
  <File Id="Uninstall.exe" Source="bin\$(var.Configuration)\Uninstall.exe" />
</Component>
<Directory Id="ProgramMenuFolder">
  <Directory Id="ApplicationProgramsFolder" Name="MySetup">
    <Component Id="MySetupShortcut" Guid="{D997EBD9-E86D-4744-B202-E1245B9E04F7}">
      <Shortcut Id="UninstallShortcut" Name="Uninstall MySetup" Description="Uninstall MySetup"
                Target="[INSTALLLOCATION]Uninstall.exe"
                Arguments="/x"
                WorkingDirectory="INSTALLLOCATION"/>
      <RemoveFolder Id="ApplicationProgramsFolder" On="uninstall"/>
      <RegistryValue Root="HKCU" Key="Software\Microsoft\MySetup" Name="Installed" Type="integer"
       Value="1" KeyPath="yes"/>
    </Component>
  </Directory>
</Directory>
Once installed, the shortcut can be used to uninstall the application. During uninstall the MSI component will fetch the product id from registry and invoke msiexec /x.
Links
- Source Code, run
build all /p:Configuration=Releaseto build